Labels

apples (2) beans (4) cleaning products (1) cooking (9) crafts (12) deals (3) desserts (1) dry milk (3) food storage (15) garden (2) gift giving (14) giving (1) gluten free (1) Halloween (1) laundry (1) mason jars (2) meatless monday (2) oats (1) pasta (6) Provident Living (21) pumpkin (1) Recipes (13) rice (2) Soup (4) storage solutions (1) tomatoes (4) wheat (1) zucchini (1)
Showing posts with label crafts. Show all posts

Friday, October 28, 2016

A Frightfully Frugal Food Flaunt - Bones 'n Blood -

SAM_7478

Serving any kind of treat for an event deserves a clever presentation.  Each year at our Elementary school our 4th graders have a fun afternoon feast of “Gross Grub” around Halloween time and the feast features healthy foods for the kids to snack on as sort of a counter attack on all the candy they tend to consume at this holiday.  This year, my daughter decided her contribution for this event would be “Bones ‘n Blood”.  It sounds terrifying but really it is just bread sticks dipped in Marinara.   For more of a meal and not just a side you could serve these with Tomato Soup. 

But how could I serve a huge pile of bones straight from a… boring Rubbermaid container???  And what about the blood?  I searched around home to see what I had already and then glanced at the store.  Nothing inexpensive was striking my fancy. 

After mulling this over (I dream about problems like these to solve… their solutions come in sleep or while driving for me or sometimes just as I sit at the desk and begin working) I decided that a simple canning jar that my daughter could decorate with leftover Halloween stickers would be just the thing for the blood.  And a large paper bag was just the solution for serving bread stick bones in IF, and only IF, it were decorated to look like Frankenstein.

I snipped the top of a paper bag in a zig-zag to look like scary hair, I found some artsy black foam and a scrap of green ribbon, two milk bottle caps in my recycling bin and a couple of googly eyes in my craft supplies.  For the nose I simply used a small colored band aid I happened to have on hand in the medicine cabinet and the mouth is a shred of red ribbon although I would have used rick-rack if I’d had it.  I drew in a scar with black permanent marker and shaded the entire bag face with white chalk, rubbing it in with my fingers when I was done.
 
This is my inexpensive way to cleverly present spooky food at a Halloween Party.

SAM_7480SAM_7483

Serving containers were free with what I already had on hand combined with some creativity.

SAM_7481


I stretched the recipe to feed more people by dividing the dough into twice as many strips for biscuits as the original recipe suggests for its twisted bread sticks.  A triple batch of these, now serving 72, cost about $1.50 using just 5 typical bread ingredients readily found in the pantry: water, sugar, yeast, salt and flour which produced a very soft, easy to work with dough.  If you choose store bought dough to shape yourself the price will rise.  Barilla Marinara Sauce was on sale for $1.77.  The main cost was my time.  I was home for 2 hours getting other things done while the dough was raising.  I spent the last 45 minutes of that time giving them undivided attention as I cut and formed one batch of bread sticks at a time and pushed them through the oven while I approached the next batch and repeated the same process allowing them to raise, covered and on the warm stove top, only while the previous batch was baking, two trays at a time until all three batches were cooling.

To make more of a meal with these I suggest dipping these into an accompanying homemade tomato soup, also blood-like if that suits your occasion, which is super simple to make and more satisfying than its canned counterpart.

Wednesday, August 19, 2015

Secret Fairy Garden

While my heart most certainly lies elsewhere, in reality I live in a fairly urban area barely outside of the city limits with a postage stamp yard that is nearly as tight on space for us as the inside of our little house is with five children.  But while space may be tight and reality suggests something less than perfect there is no limit on where our imaginations can carry us.  My now 8 year old daughter and I have enjoyed working on this idea of a fairy garden over the past several years adding to it a little bit at a time.  It is a work always in progress.  This project is fun, a great way to connect and spend time with your child or just combat boredom on hot summer days.  Best of all, this is entertainment that takes no money using things that are already on hand or can be found lying unused and underappreciated around the house or garage.  I like to keep a little junk box the size of a shoe box for odds and ends that come in handy for projects such as this.    Using your imagination, the sky is the limit.  

So take a walk past our tomato garden next to the garage, through the locked garden gate overflowing with white flowery vines, underneath the arbor filled with pink lemonade honeysuckle; an oasis for hummingbirds, past the spring lilacs and you’re on your way to escape in a Secret Fairy Garden; the stuff literary tales are spun of.

SAM_6831SAM_6830SAM_6823

On the curved path, pass the Black Eyed Susans, the Welcome Kitties and the small love rock that was a Mother’s Day gift.

SAM_6829SAM_6832SAM_6820

Pass the remembrance garden filled with impatiens, the three little kittens and a wonderful pink butterfly.

SAM_6822SAM_6821SAM_6825

You will find a small bird house floating in the midst of some tall wild flowers.  Duck behind the laundry airing out on the line daily and it’s time to look down to find a tiny little Fairy Garden filled with treasure and the inspiring imagination of a little girl.

SAM_6828SAM_6685

Take a seat!  Take a close look… Strung on floral wire between a picnic fork and spoon you will find “Joy Garden” crafted from alphabet beads and a fairy sign made out of popsicle sticks in the midst of tiny flowers with bead pots and a clam shell growing a tiny bed of flowers which guard a single little white pearl in an area littered with the smallest shells pockets can hold from our Northern Atlantic Coast summertime adventure.

SAM_6819SAM_6815

Among these you will find a little fairy contemplating by her bead pot filled with flowers who watches over her cute tiny turtles and her bicycle.

SAM_6808SAM_6826

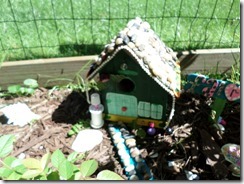
In a sunny spot sits a small wooden birdhouse found in the garage repurposed; repainted and decorated to a Fairy’s liking with fresh green paint, a string of pearls, some flowers and a stone roof with a stony walkway to the front door as well.  More bead pots adorn the landscape and a marble serves as a ball for Fairy recreation.

SAM_6679SAM_6813

Did you notice the little table and lamp… made from an empty spool, a pink cut straw and a toothpaste cap… perfect for reading in the evenings or sitting on the clam shell and watching a sunrise.

SAM_6686

Here is the little clam garden with the pearl again and a resident horse goes for a refreshing drink at the shell pond.

  SAM_6687SAM_6809

His stable nearby is tucked secretly under the peony leaves next to some more coastal treasures.

SAM_6682SAM_6817

Tucked under the greenery and within the forest of mint or among the rocks lining the Fairy garden you will see that our Fairy Friend shares her space with a sweet little cow, a friendly squirrel and a Maine Coast Minion who doesn’t really cause any trouble.  The black and white kitty mysteriously disappeared during our vacation and is sorely missed now.

SAM_6827SAM_6812SAM_6810

The time my daughter and I have spent here with our imaginations working together truly makes this a garden of joy.

Wednesday, May 27, 2015

More Paper Bag Scrap Books

Inspired by how much I enjoyed making my Mom’s paper bag scrap book and the desire to make a special homemade gift for a special retiring teacher that I had the opportunity to work with this past year as she taught a third child of mine I decided that another paper bag scrap book was the best gift I could give.  Our kindergarten teacher had made the most amazing scrap books for each of my children the year she had them and I hoped she might enjoy being on the receiving end as much as we had.


Again, I alternated direction of the paper bags so that the openings and flaps would lay neatly and create interesting flaps and pockets for the scrap book.  I found pictures of each of my children from the year she had had them and found quotes and poetry about teachers.  Each of my children included a personal note as well, to make it more meaningful. 

SAM_5878SAM_5920SAM_5921

SAM_5922SAM_5923SAM_5924

SAM_5926SAM_5928SAM_5929

SAM_5930SAM_5931SAM_5932

SAM_5933

My second grade daughter enjoyed making an appreciation gift for her teacher modeled after my scrap book.  Easy and fun… just takes time.

SAM_5919SAM_5879SAM_5880SAM_5881SAM_5882SAM_5883

This was so much fun we spent more time making one for the retiring principal who had been so helpful to us through the years as well!  Perhaps you will be inspired to make a personal gift that is both meaningful and inexpensive.

SAM_5934SAM_5935SAM_5940

SAM_5936SAM_5941SAM_5942

SAM_5943SAM_5944SAM_5946

Of course, what better gift wrap for a  paper bag scrap book than a brown paper bag!  I love brown paper bags!  Tied with kitchen twine and decorated with a sticker and a fresh spring flower, it was a festive looking package with a gift straight from the heart.

SAM_5947